
Manual
Argon Audio TT MK2 – User Manual
1. Overview
1.1 What is in the Box
Please check thoroughly and make sure all of the following items are present before setting up:
Turntable / Plinth
Power Adaptor with EU plug
Counterweight
Platter with Drive Belt
Sub-Platter
45 RPM Adapter
Turntable Mat
Quick Start Guide
Cartridge Alignment Protractor
RCA-to-RCA cable (with ground wire)
Keep the original box and packing material for future transportation.
1.2 Parts Names and Functions
Turntable:
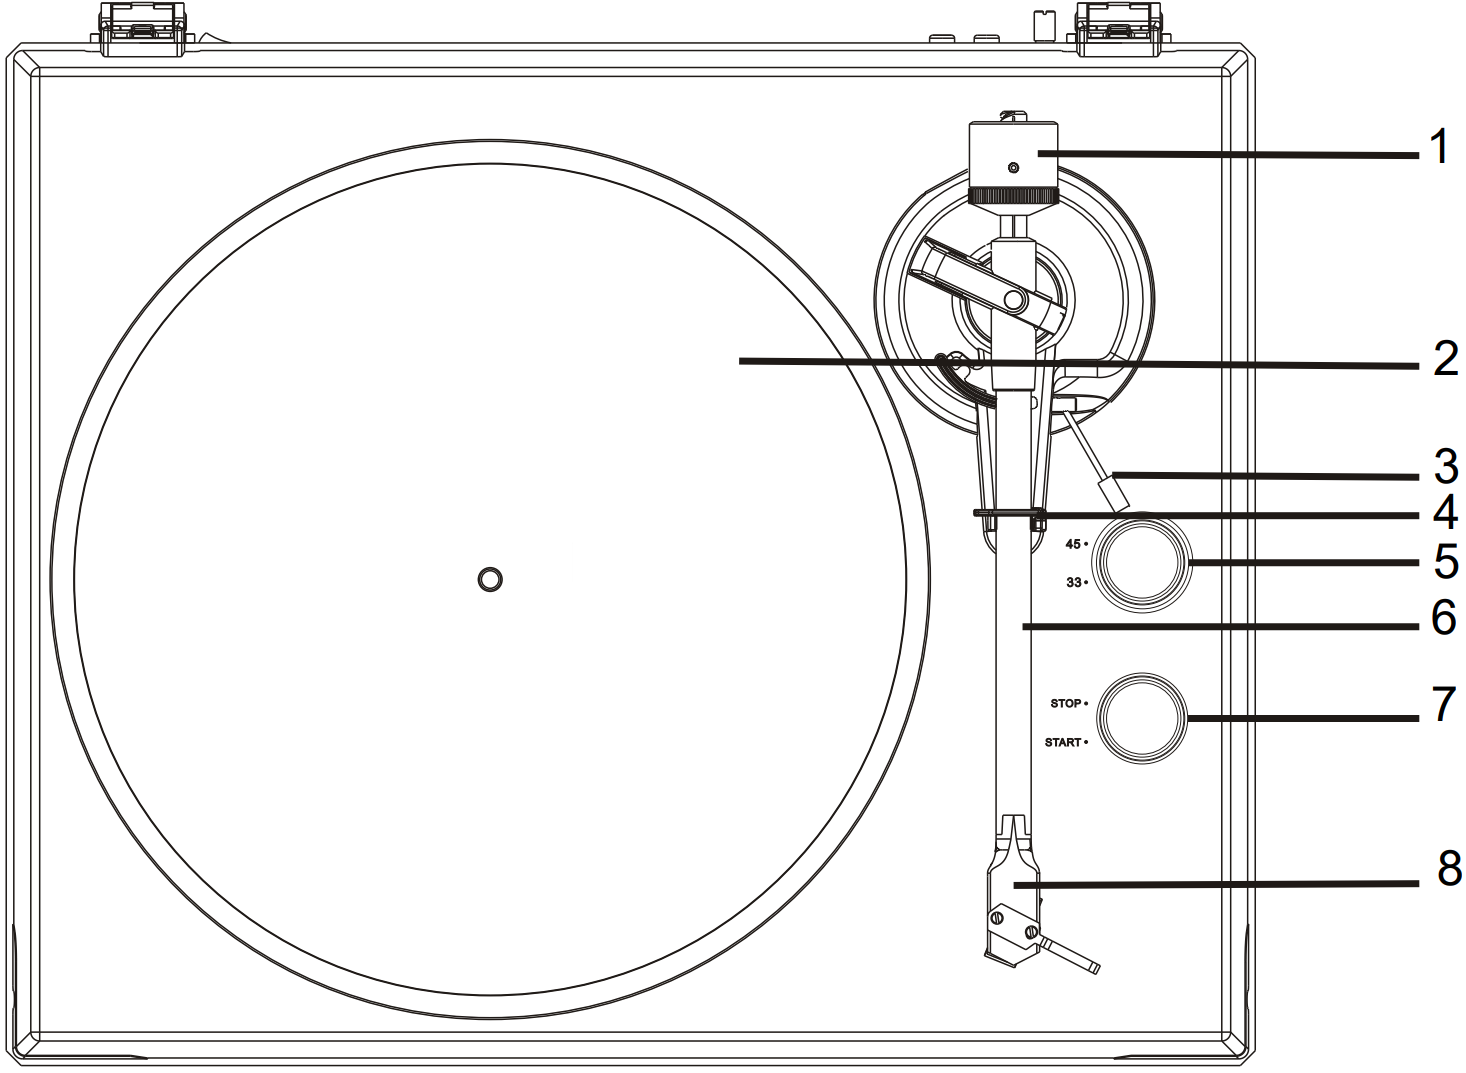
Counterweight – Adjusts the tracking force applied by the cartridge to the record groove.
Turntable Platter – The surface on which the record rests during playback.
Tonearm Lift Lever – Raises and lowers the tonearm onto the record in a controlled manner.
Tonearm Rest – Holds the tonearm securely when not in use.
33/45 Selector – Switches playback speed between 33 1/3 and 45 RPM.
Tonearm – The arm that holds the cartridge and tracks the record groove.
Start/Stop Button – Starts and stops the platter motor.
Cartridge – The component housing the stylus that reads the record groove.
Lid – Protective dust cover for the turntable.
Lid Hinge – Hinge for the lid
Ground Connector – Dedicated grounding terminal for connecting to an amplifier or phono preamplifier.
PHONO & Line Out Jacks – RCA output connections to an amplifier or preamplifier.
RIAA ON/OFF Switch – Enables or disables the built-in RIAA phono preamplifier.
AC-DC Power Jack – Connection point for the power adapter.
Power Rocker Switch – Main power on/off switch.
Rear Panel: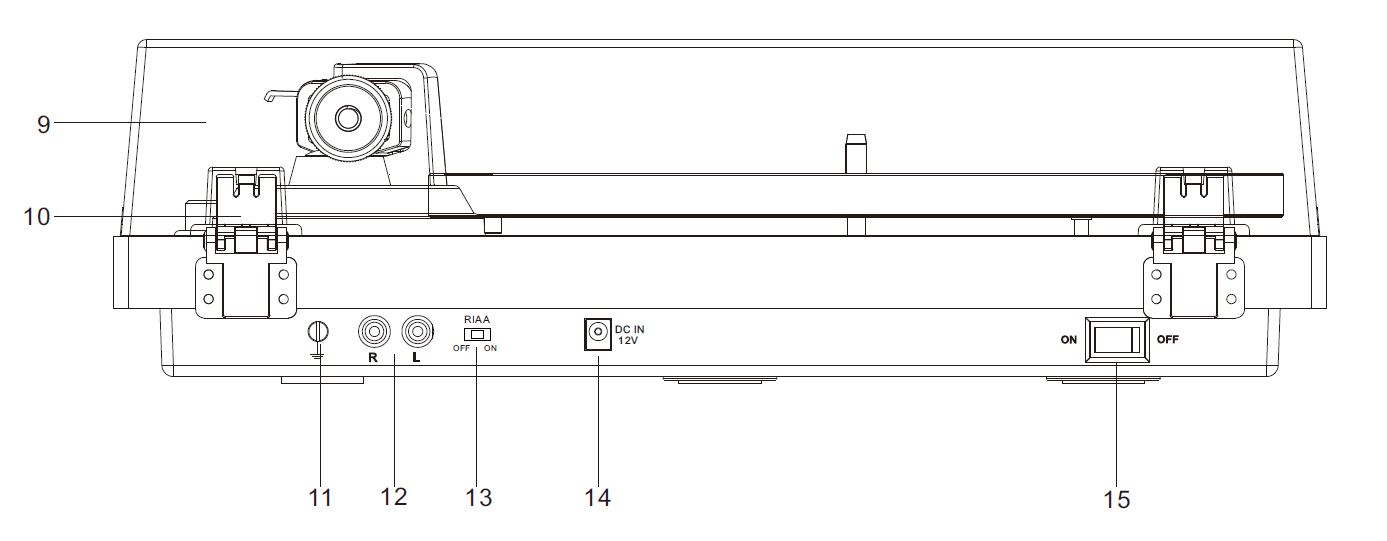
Note: The TT MK2 is supplied with a factory-fitted and adjusted Audio-Technica AT-3600L cartridge.
1.3 Unpacking
Carefully unpack the TT MK2 and all accessories listed in section 1.1. We recommend keeping the original box and all packing materials for any future transportation or storage.
1.4 Safety Instructions
Please read and follow these safety instructions carefully before using the TT MK2:
Power supply – The TT MK2 is designed for international use and operates via the included external power adapter. Only use the supplied power adapter. Do not use any other power adapter, as this may damage the turntable or create a safety hazard.
Do not open the unit – There are no user-serviceable parts inside the turntable or its power adapter. Do not attempt to open, modify or repair any internal components. Doing so may result in electric shock, fire, or permanent damage to the unit and will void the warranty. Always refer servicing to qualified personnel.
Liquids and moisture – Keep the turntable away from liquids, rain, and excessive humidity. Never place objects containing liquids, such as vases or drinks, on or near the unit.
Power cord – Route the power adapter cable carefully to avoid tripping hazards and prevent damage to the cable. Do not pinch, bend sharply or place heavy objects on the cable.
Disconnecting from power – Always disconnect the turntable from the power supply before performing any maintenance, cleaning, or cartridge work.
Long periods of non-use – Disconnect the turntable from the mains supply if it will not be used for an extended period.
Children – Keep small accessories such as the stylus, 45 RPM adapter, and counterweight out of reach of young children.
1.5 Positioning and Placement
Correct placement of the TT MK2 is important for optimal sound quality and safe operation:
Place the turntable on a firm, stable, and level surface. The TT MK2 does not have adjustable feet, so the surface itself must be level. An unlevel surface can cause the tonearm to drift across the record and will negatively affect tracking and sound quality.
Isolate from vibration – Avoid placing the turntable on or near speakers, subwoofers, or any surface subject to vibration. Vibrations transmitted to the turntable can cause the stylus to skip or introduce unwanted resonance into the sound.
Distance from loudspeakers – Keep the turntable as far as practically possible from your loudspeakers. At higher volumes, acoustic feedback from the speakers can be picked up by the stylus, resulting in a low rumbling or howling sound.
Ensure there is sufficient space around the turntable to operate the tonearm and lid freely.
Keep the turntable away from direct sunlight, heat sources, and strong magnetic fields.
1.6 Cleaning and Care
Remove dust with a slightly damp antistatic cloth. Never use a dry cloth, as this creates static electricity and attracts more dust. Never use solvents or chemical cleaners.
Always fit the stylus cover before cleaning or performing any maintenance to protect the stylus from accidental damage.
If the turntable will not be used for an extended period, remove the drive belt to prevent unequal stretching.
Always disconnect the turntable from the power supply before any cleaning or maintenance.
Handle the stylus and cartridge with care — they are precision components and are easily damaged.
1.7 Functionality and Technology
Belt Drive System – The platter is driven by a rubber belt looped around the sub-platter and motor pulley. This design mechanically isolates the platter from motor vibration, resulting in a lower noise floor compared to direct drive systems.
Moving Magnet (MM) Cartridge – The TT MK2 is fitted with an Audio-Technica AT-3600L moving magnet cartridge. MM cartridges are the most widely compatible type and work with the built-in RIAA stage as well as any external MM phono input.
Built-in RIAA Preamplifier – An integrated RIAA phono preamplifier allows the TT MK2 to connect directly to any standard line-level input (e.g. AUX) on an amplifier or receiver, without requiring a separate phono stage. It can be switched off when using a dedicated phono input.
Two-Speed Operation – Supports both 33 1/3 RPM (LP records) and 45 RPM (singles and EPs).
2. Setup
2.1 Setup of Turntable (Platter & Belt)
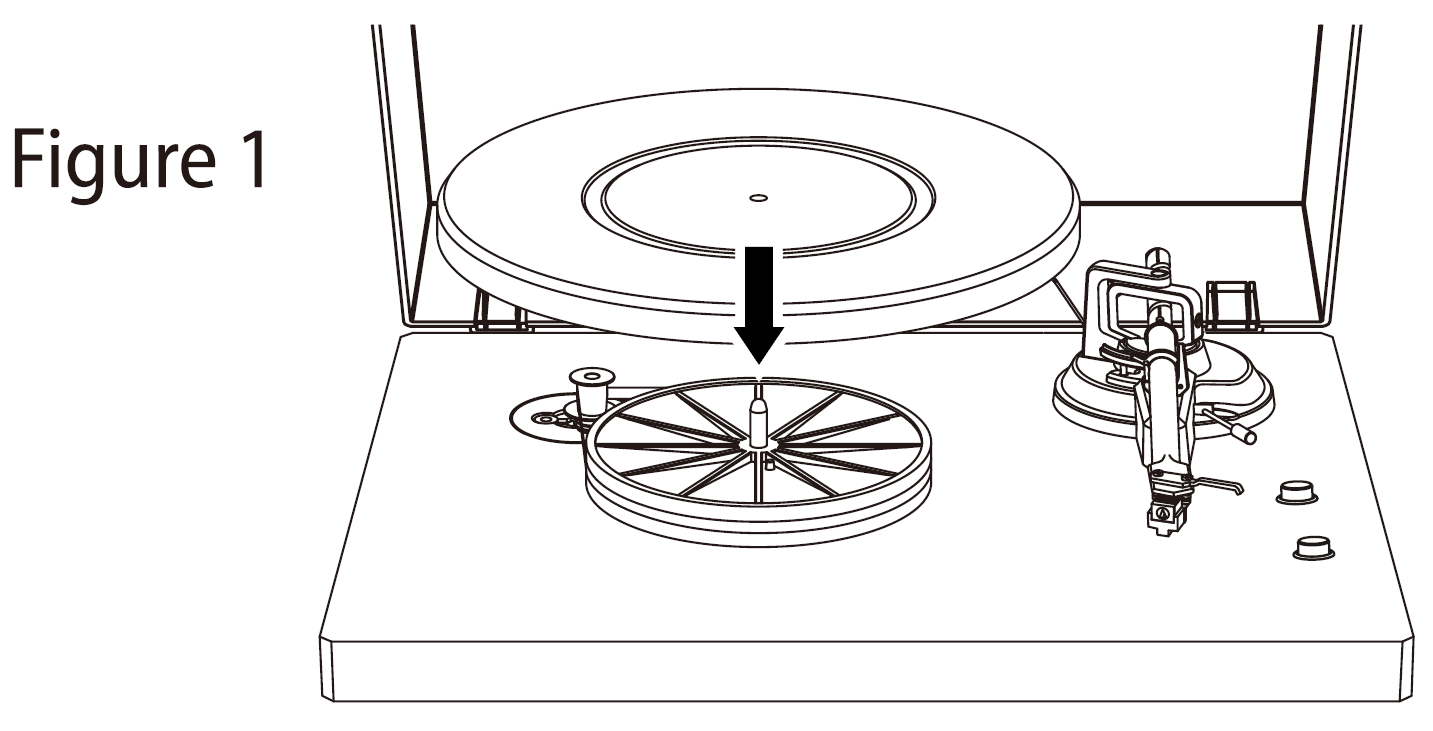
Insert the sub-platter into the turntable spindle in the centre of the turntable.
Loop the drive belt around the sub-platter and the motor pulley.
Carefully place the main platter onto the sub-platter.
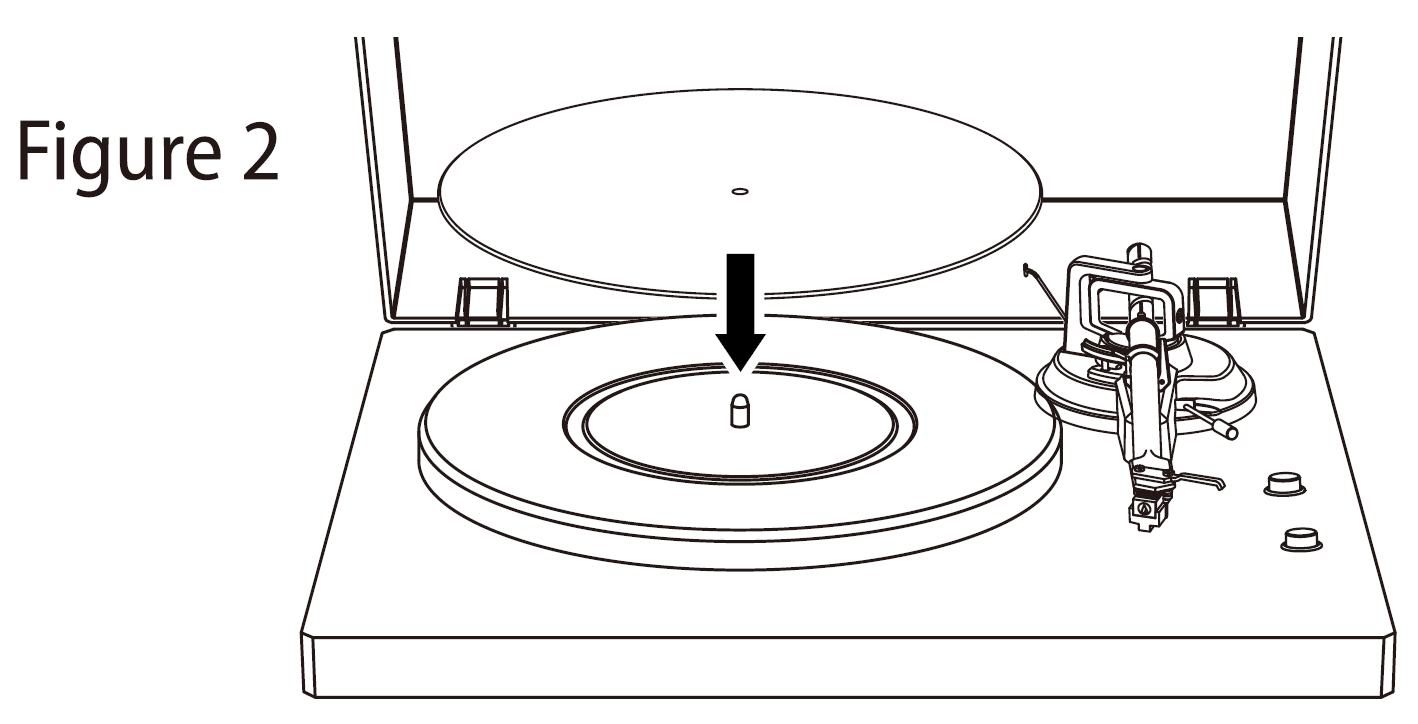
Place the slip mat on top of the platter.
Connect the power adapter and power on the turntable.
Set the Start/Stop switch to Start to verify the platter motor spins correctly. If the platter does not spin, recheck the belt placement around the sub-platter and motor pulley and repeat the steps above.
2.2 Setup of Optional Accessories (Lid)
Install the lid carefully over the hinge prongs on the rear of the turntable. Ensure both hinge prongs are properly seated before opening or closing the lid.
2.3 Tracking Force
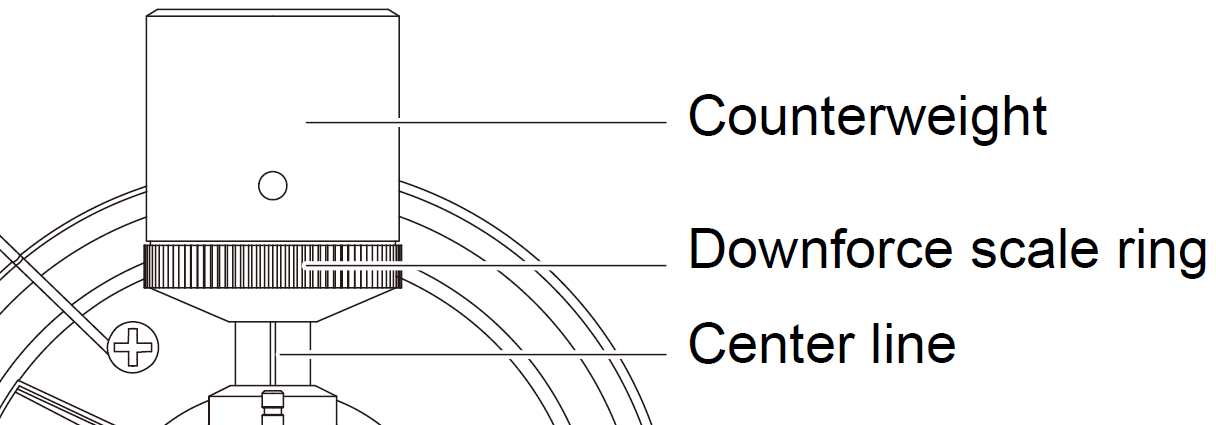
2.3.1 Manually
Gently push and turn the counterweight onto the rear of the tonearm, with the scale facing toward the front of the turntable.
Remove the cartridge protection cap.
Lower the tonearm lift and position the cartridge in the space between the tonearm rest and the platter.
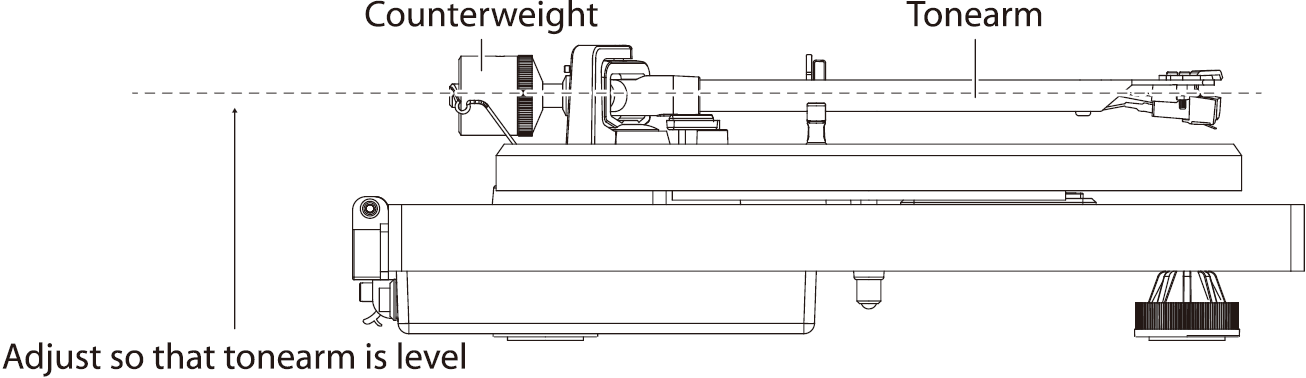
Carefully rotate the counterweight until the tonearm balances horizontally — it should return to the balanced position when gently moved up or down. Perform this step carefully.
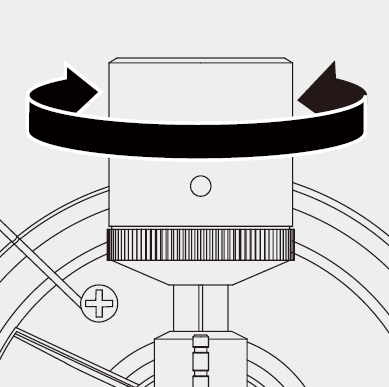
Once balanced, return the tonearm to its rest. Hold the counterweight steady without rotating it, and gently rotate the Downforce Scale ring until the zero mark aligns with the black line on the rear of the tonearm. Verify the arm still balances correctly.
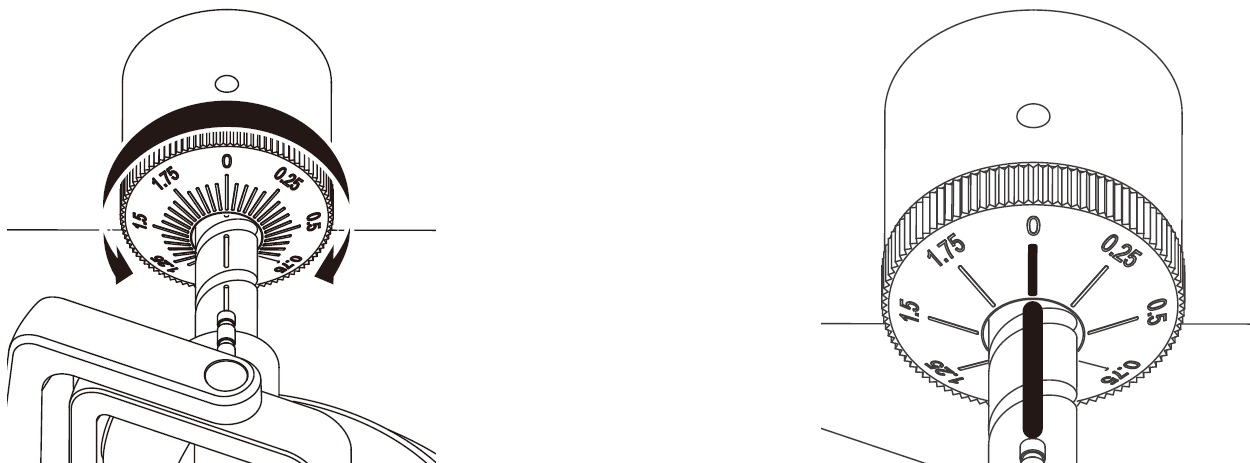
Rotate the counterweight counter-clockwise (viewed from the front) to dial in the desired downforce. Each mark on the scale represents 0.05g of downforce. Set the downforce according to the cartridge manufacturer's recommendation.
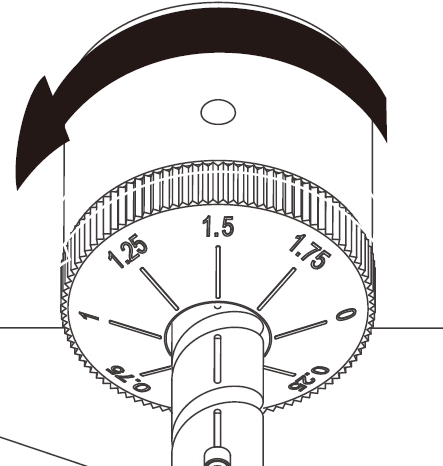
Note: The recommended tracking force for the factory-fitted Audio-Technica AT-3600L cartridge is 3.5g (± 0.5g). The supplied counterweight is suitable for cartridges weighing between 3.0–6.0g.
2.3.2 With Tipping Tool
(Not applicable for this model)
2.3.3 With Electrical Scale
(Not applicable for this model)
2.4 Anti-Skating
(Not available on this model)
2.5 Installation and Change of Pickup
Note: While it is possible to replace the cartridge, it is not recommended for most users. The TT MK2 comes configured with a factory-fitted and aligned cartridge. Using other cartridges may result in improper functionality. If you are unfamiliar or uncomfortable with this procedure, consult a professional or your point of purchase.
2.5.1 Change of Needle (Stylus)
The Audio-Technica AT-3600L uses a replaceable stylus. To replace the stylus only, without removing the cartridge body:
Fit the stylus cover to protect the stylus during handling.
Carefully pull the stylus assembly straight forward and downward to detach it from the cartridge body.
Align the new stylus assembly with the cartridge body and press it gently but firmly into place until it clicks or seats securely.
Remove the stylus cover before playback.
2.5.2 Change of Cartridge
Fit the stylus cover to protect the stylus during the procedure.
Carefully remove the wire leads from the original cartridge terminals.
Loosen the two screws on the headshell securing the cartridge and remove the original cartridge.
Mount the new cartridge to the headshell and tighten the screws lightly — do not fully tighten yet.
Connect the wire leads to the new cartridge's terminals according to the standard color coding:
Color |
Channel |
|---|---|
White |
Left channel positive (L+) |
Blue |
Left channel negative (L–) |
Red |
Right channel positive (R+) |
Green |
Right channel negative (R–) |
Align the cartridge using the alignment protractor (see section 2.7.1).
Tighten the screws completely once correct alignment is achieved.
Set the tracking force according to the new cartridge manufacturer's specifications (see section 2.3.1).
2.5.3 Change of Headshell
(Not applicable for this model — the headshell is fixed)
2.6 VTA / Azimuth Settings
(Not available on this model)
2.7 Use of Included Accessories and Tools
2.7.1 Alignment Tool (Cartridge Alignment Protractor)
Place the included paper cartridge alignment protractor over the turntable spindle. Carefully lift the tonearm and place the tip of the stylus onto the points marked 130mm and 250mm respectively. Fine-tune the cartridge's position on the headshell until it is perfectly parallel with the reference lines at both points. Tighten the cartridge screws fully once correct alignment is confirmed.
2.7.2 Singles Adapter (45 RPM Adapter)
When playing 45 RPM single records, place the 45 RPM adapter onto the center spindle before placing the record on the platter. This fills the larger center hole common on 7" singles.
3. Connections
3.1 Connecting to an devices with TT MK2’s integrated RIAA
The TT MK2 has a built-in RIAA preamplifier, allowing direct connection to any standard line-level input (e.g. AUX, CD, TAPE) on an amplifier or receiver — no separate phono stage required. Also it is possible to connect them to Bluetooth speakers via mini-jack adapters.
Set the RIAA ON/OFF Switch to ON.
Connect the included RCA cable from the PHONO & Line Out Jacks on the rear of the turntable to a line-level input on your amplifier.
Optionally connect the ground wire (the separate strand on the RCA cable) from the turntable's Ground Connector to the ground terminal on your amplifier. While no ground wire is needed when using the integrated RIAA preamplifier, still conecting the groundwire can help reducing or eliminating hum.
Note: Do not connect to a dedicated phono input on your amplifier when the RIAA switch is set to ON, as this will result in an overloaded, distorted signal.
Note: Some bluetooth speakers are not optimized for connecting a turntable and may have reduced sound quality or produce noise, hum or static sounds.
3.1.1 Turning the RIAA On and Off
RIAA ON – Use when connecting to a line-level input (AUX, CD, TAPE, etc.) on an amplifier or receiver.
RIAA OFF – Use when connecting to a dedicated phono input or external phono preamplifier.
3.2 Connecting to a Phono Input or dedicated Phono Preamplifier
If using a dedicated phono input on your amplifier, or a separate external phono preamplifier:
Set the RIAA ON/OFF Switch to OFF.
Connect the RCA cable from the PHONO & Line Out Jacks to the phono input on your amplifier or external phono preamplifier.
Connect the ground wire to the ground terminal on the amplifier or phono preamplifier to reduce hum.
Note: When using a decicated phono input or external phono preamplifier, the ground cable has to be connected, otherwise there will be an audible hum.
4. Playback
Connect the power adapter and press the Power Rocker Switch to the ON position.
Remove the needle/stylus cover from the cartridge.
Place the slip mat on the platter and place your record on the slip mat.
For 45 RPM records, place the 45 RPM adapter on the center spindle before placing the record.
Set the 33/45 RPM Selector according to the record type.
Turn the Start/Stop dial to Start to begin spinning the platter.
Unlock the arm clip and raise the Tonearm Lift Lever to the up position.
Position the tonearm over the desired groove on the record.
Carefully lower the tonearm onto the record using the Tonearm Lift Lever.
When finished, raise the tonearm using the Lift Lever, return it to the tonearm rest, secure the arm clip, and turn the Start/Stop dial to Stop.
5. Basic Operation
5.1 Turning On and Off
Connect the power adapter to the AC-DC Power Jack on the rear panel and plug it into a power outlet.
Press the Power Rocker Switch to turn the turntable on or off.
5.2 Changing Speeds
Use the 33/45 RPM Selector to switch between:
33 1/3 RPM – Standard LP and 12" records
45 RPM – 7" singles and EPs (use the included 45 RPM adapter on the center spindle)
5.3 Lowering and Raising the Tonearm
Always use the Tonearm Lift Lever to raise and lower the tonearm in a controlled manner. Never drop the tonearm directly onto a record, as this can damage both the stylus and the record. When not in use, always return the tonearm to the tonearm rest and secure it with the arm clip.
5.4 Additional Functionality
(No additional features such as Bluetooth, auto-stop or end-stop are available on this model)
6. Tips
6.1 Troubleshooting
Symptom |
Possible Cause |
Solution |
|---|---|---|
No or quite/distorted sound |
RIAA switch in wrong position |
Check RIAA ON/OFF switch matches your amplifier input type |
No sound |
Incorrect amplifier input selected |
Ensure the correct input is selected on your amplifier |
No sound |
RCA cable not connected properly |
Check all cable connections at both the turntable and amplifier |
No sound |
Stylus cover still attached |
Remove the stylus cover before playback |
Hum or buzz |
Ground wire not connected |
Connect the ground wire to the ground terminal on your amplifier |
Hum or buzz |
RIAA switch set to ON and connected to phono input |
Set RIAA switch to OFF when using a phono input |
Platter not spinning |
Belt not properly installed |
Recheck belt placement around sub-platter and motor pulley |
Platter not spinning |
Power not connected |
Check power adapter connection and rocker switch position |
Stylus skipping |
Tracking force too low |
Increase tracking force — minimum 3.0g for the AT-3600L |
Stylus skipping |
Turntable surface not level |
Ensure the turntable is placed on a firm, level surface |
Stylus skipping |
Vibration from speakers |
Move turntable further from loudspeakers |
Distorted sound |
Tracking force too high |
Adjust tracking force to the recommended 3.5g (± 0.5g) |
Distorted sound |
Dirty stylus |
Clean the stylus carefully with a stylus brush |
Speed sounds wrong |
Wrong speed selected |
Check 33/45 RPM selector matches the record type |
Acoustic feedback / howling |
Turntable too close to speakers |
Increase distance between turntable and loudspeakers |
6.2 Record Care
Always handle records by their edges and label area — avoid touching the grooves with your fingers, as skin oils attract dust and degrade sound quality over time.
Store records vertically in their inner sleeves and outer covers to prevent warping and dust accumulation.
Clean records before playback using a carbon fibre brush or record cleaning cloth, brushing in the direction of the grooves.
For deeper cleaning, a record cleaning solution and microfibre cloth can be used. Always allow the record to dry completely before playing.
Keep records away from direct sunlight and heat, as this can cause permanent warping.
6.3 Stylus Care and Cleaning
Always fit the stylus cover when the turntable is not in use.
Clean the stylus regularly using a stylus brush, brushing gently from back to front (in the direction of record travel). Never brush sideways, as this can bend or snap the cantilever.
A stylus cleaning solution can be used sparingly on the brush for more thorough cleaning.
Inspect the stylus periodically for visible dust buildup, bending, or wear. A worn stylus can damage your records — replace it if there are any signs of deterioration.
The typical lifespan of a stylus is approximately 500–1000 hours of playback depending on use and care.
6.4 FAQ and User Topics
For further tips and tricks on achieving optimal performance with your turntable, refer to the article Tips & Tricks: TURNTABLES available on the Nordic Hi-Fi support page.
Appendix
A. Technical Specifications
Parameter |
Value |
|---|---|
Nominal Speeds |
33 1/3 & 45 RPM |
Speed Variance |
± 1.5% |
Wow and Flutter |
≤ 0.15% |
Signal-to-Noise |
55 dB |
Downforce Range |
3.0–6.0 g |
Effective Tonearm Length |
8.6" (218.5 mm) |
Overhang |
0.73 in |
Power Consumption |
5W (max) |
Power Supply |
12V / 500mA AC-DC |
Dimensions (W x H x D) |
420 x 360 x 125 mm |
Weight |
6.1 kg |
Cartridge Specifications – Audio-Technica AT-3600L
Parameter |
Value |
|---|---|
Frequency Response |
20 Hz – 20 kHz |
Recommended Load Resistance |
47k Ohms |
Channel Balance |
< 2.5 dB |
Channel Separation |
> 18 dB |
Recommended Tracking Force |
3.5 ± 0.5 g |
Output Voltage |
2.5 mV |
Cartridge Weight |
5 g |
Amplifier Connection |
MM Input |
B. Disposal and Recycling
The Argon Audio TT MK2 and its accessories should not be disposed of as general household waste. Please follow local regulations for the disposal of electrical and electronic equipment (WEEE). Key guidelines:
Electronics – Bring the turntable to a designated collection point or recycling centre for electrical and electronic equipment.
Packaging – Cardboard and paper packaging can be recycled through standard paper recycling. Foam and plastic materials should be disposed of according to local recycling guidelines.
Drive belt – The rubber drive belt is a consumable part and should be disposed of with general waste or rubber recycling where available.
Stylus – The stylus/cartridge contains small electronic and mechanical components. Dispose of at an electronics recycling point.
By disposing of this product correctly, you help protect the environment and human health.
C. Warranty and Support
Warranty The Argon Audio TT MK2 is covered by a warranty period of 2 to 6 years depending on the country of purchase and applicable local consumer protection legislation. The warranty covers manufacturing defects and component failures under normal use. It does not cover damage resulting from improper use, unauthorized modifications, or failure to follow the instructions in this manual.
Support and Contact For support, spare parts, firmware updates and further documentation, please contact Nordic Hi-Fi:
Website: www.nordichifi.com
Email: info@nordichifi.com
Address: Nordic Hi-Fi A/S, Tilst Søndervej 136, 8381 Tilst, Denmark
Specifications and features are subject to change without notice. Please refer to the product page at www.nordichifi.com for the most current information.