
Product Manual
1. Included Items
NOTE: Before setting up the TT Turntable, please check thoroughly and make sure you find the following items that are included in the box:
Turntable/Plinth
Adaptor with EU plug end
Counterweight
Platter with Drive Belt
Sub-Platter
45 RPM Adapter
Turntable Mat
Quick Start Guide
Cartridge Alignment Protractor
RCA-to-RCA cable (with ground cable)
We recommend that you keep the original box and packing material for future transportation.
2. Components, Features, and Connections
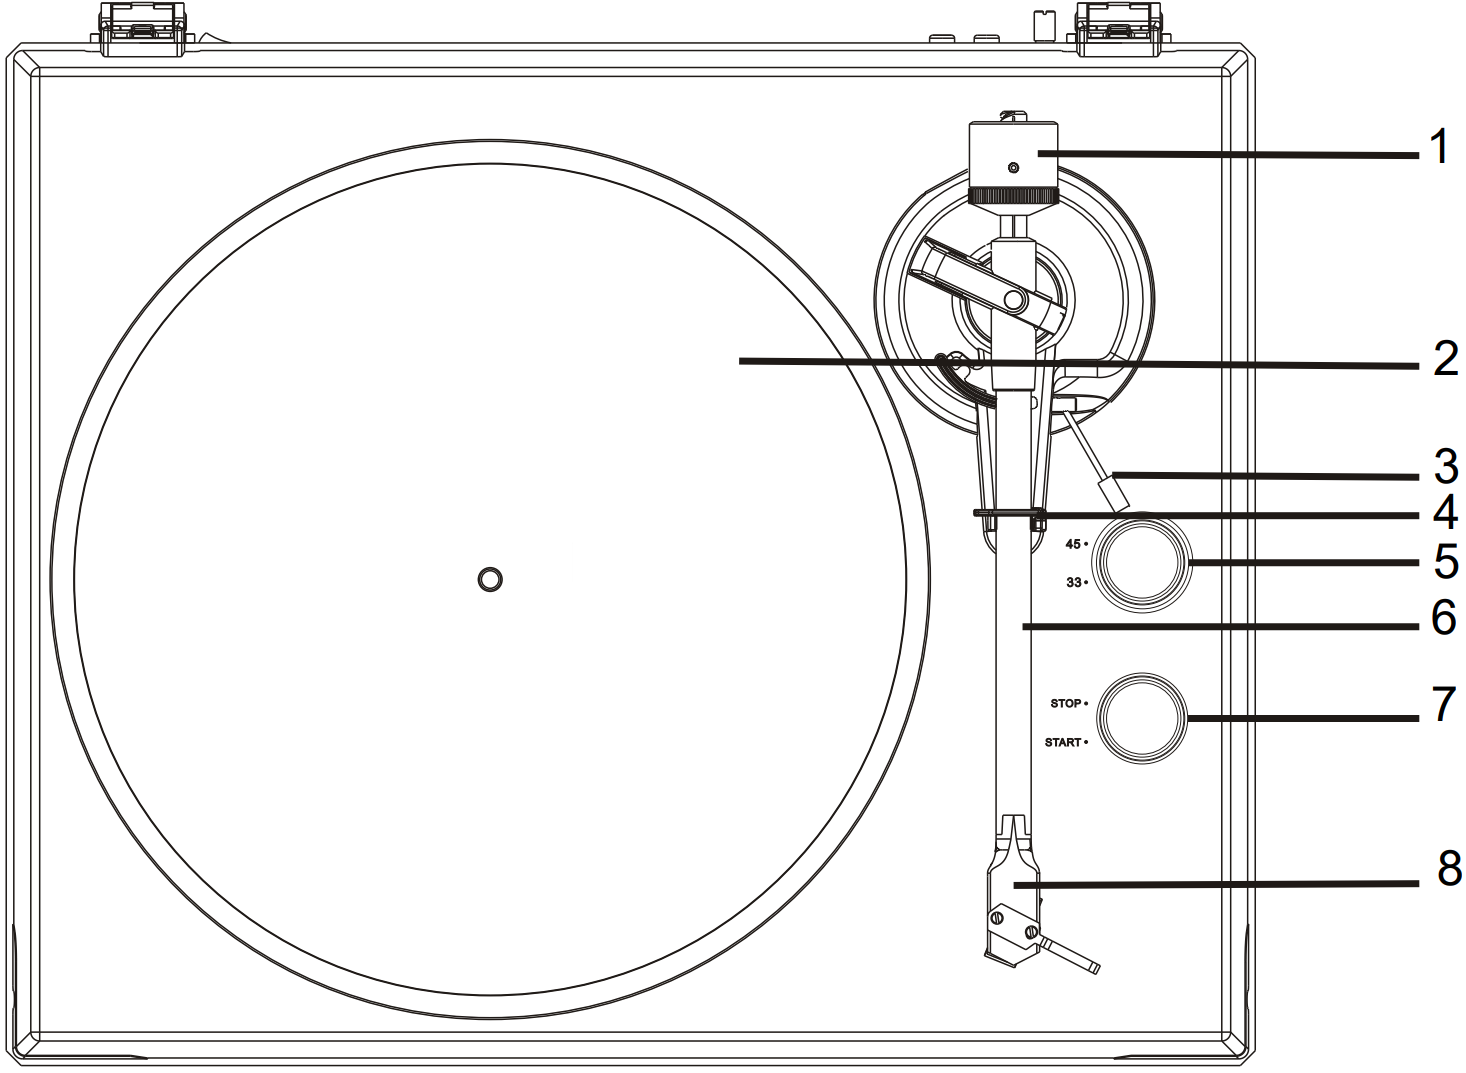
Counterweight
Turntable Platter
Sub-Platter underneathTonearm Lift Lever
Tonearm Rest
33/45-Selector
Tonearm
Stop/Start-Button
Cartridge
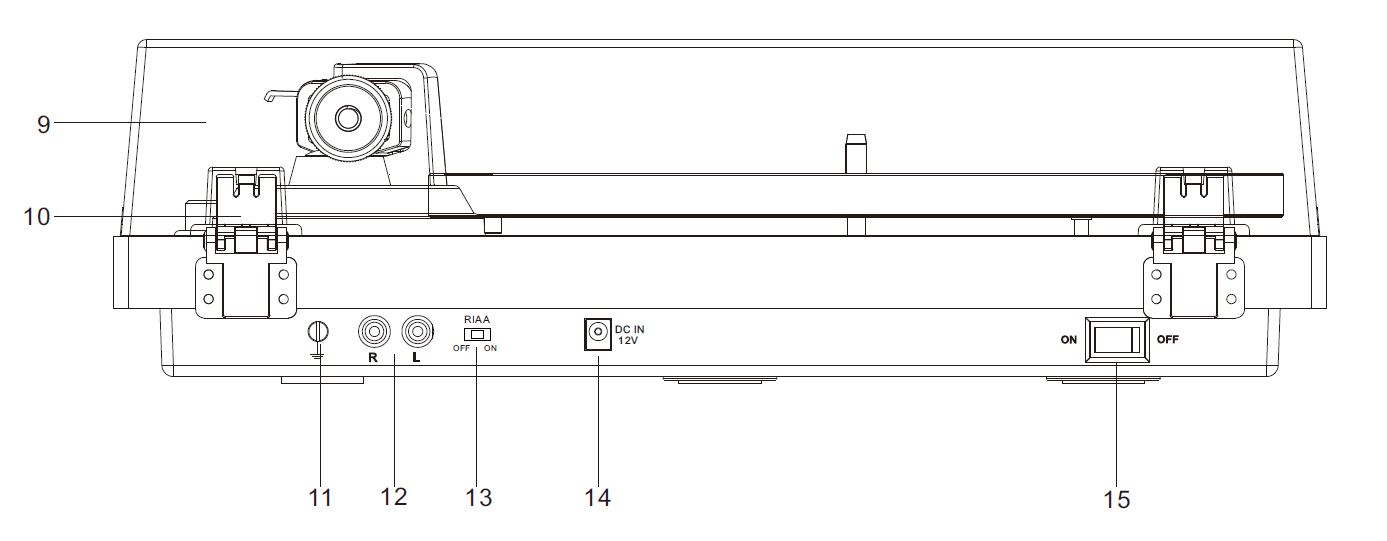
Lid
Lid Hinge
Ground Connector
PHONO & Line Out Jacks
RIAA ON/OFF Switch
AC-DC Power Jack
Power Rocker Switch
This turntable is supplied with a factory-fitted and adjusted cartridge.
3. Installing the Lid
Install the Lid carefully over the hinge prongs.
4. Turntable Platter and Belt Setup
Insert the sub-platter into the turntable spindle located in the middle of the turntable
Loop the drive belt around the sub-platter and motor pulley.
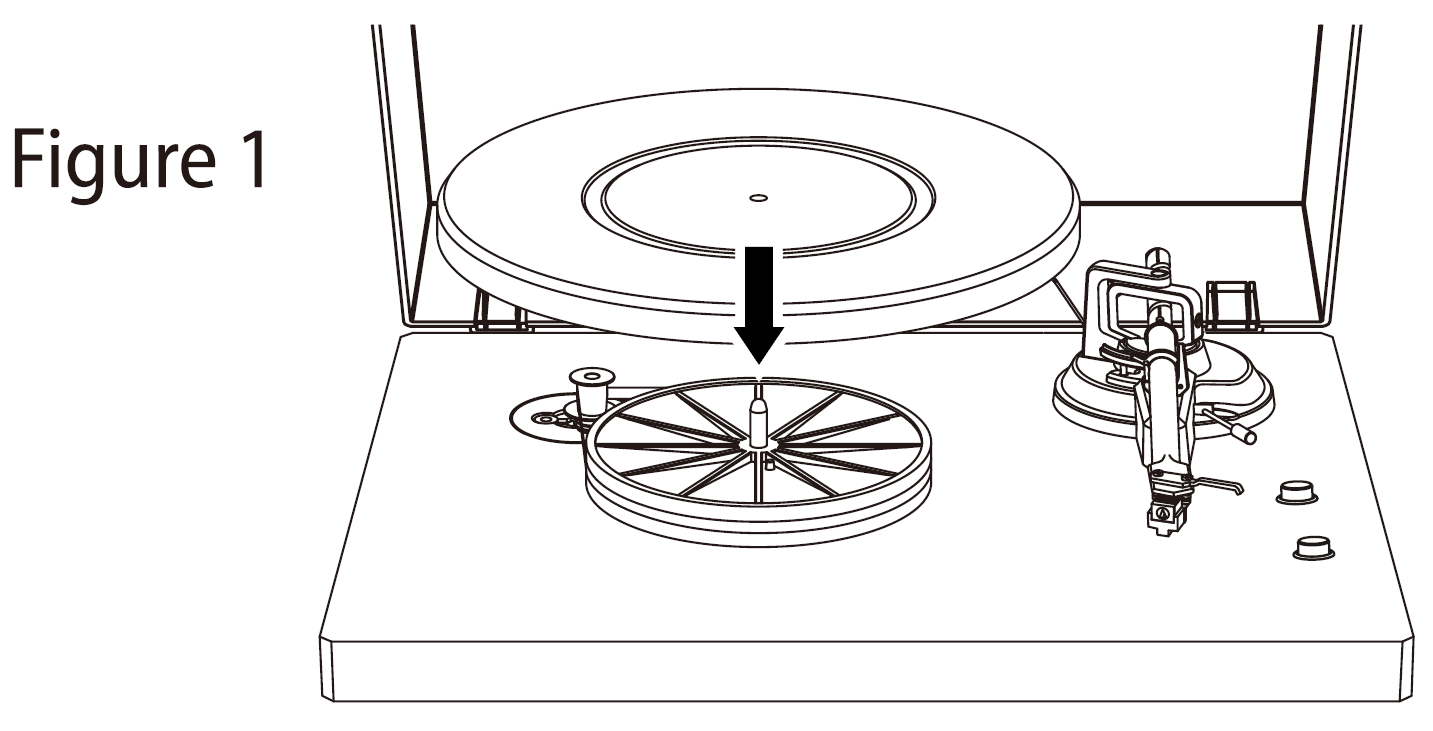
Carefully place the main platter onto the sub-platter (Figure 1).
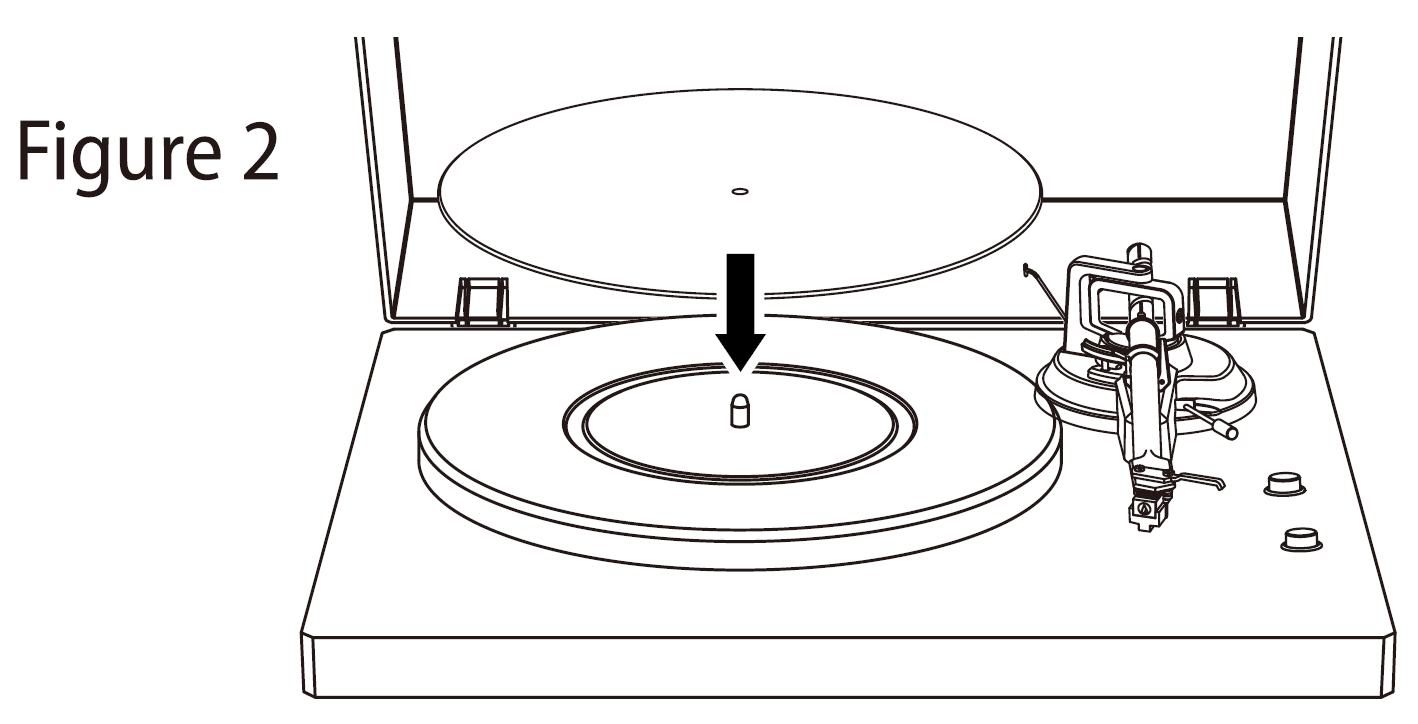
Place the slip mat on top of the platter (Figure 2).
Connect the power adapter to the turntable and power on the turntable.
Set the Motor Start/Stop switch to the Start position to see if the platter motor spins. If the platter does not spin, try the steps listed above again.
5. Cartridge Downforce Adjustment
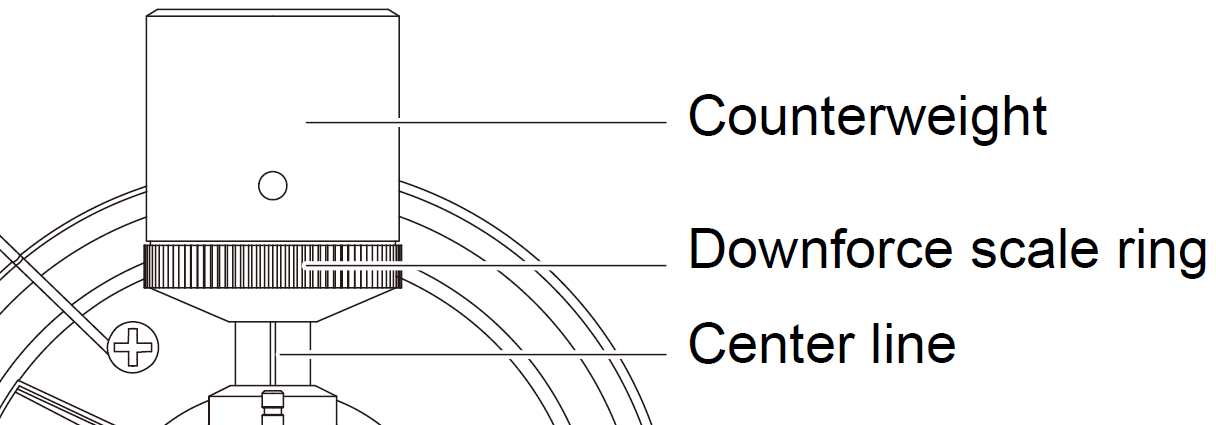
The Counterweight supplied is suitable for cartridges weighing between 3.0-6.0g.
Gently push and turn the Counterweight onto the rear of the tonearm (with the scale facing toward the front of the turntable).
Remove the cartridge protection cap.
Lower the tonearm lift and position the cartridge in the space between tonearm rest and platter.
Carefully rotate the Counterweight until the tonearm balances out. The tonearm should return to the balanced position if it is moved up or down. This adjustment must be done carefully.
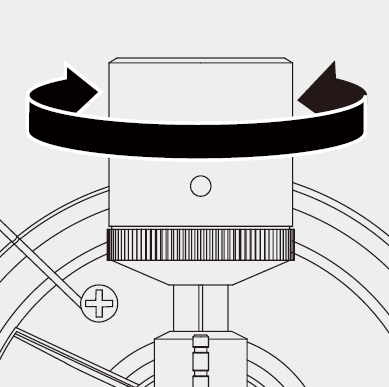
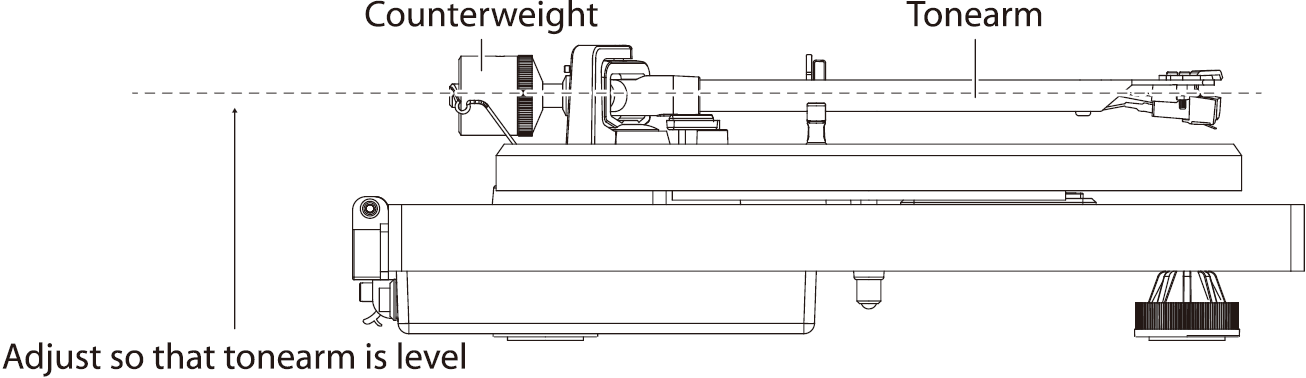
Once the tonearm is correctly balanced return it to its rest. Hold the Counterweight without moving it, and gently rotate the Downforce Scale ring until the zero is in line with black line on the rear of the Tonearm. Check whether the arm still balances out.
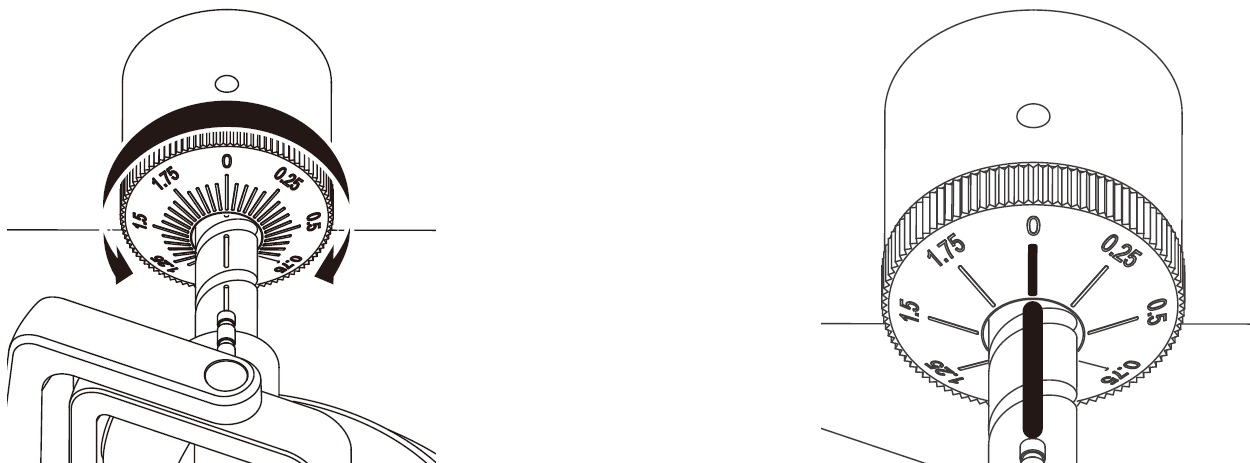
Rotate the counterweight counter clockwise (seen from the front) to adjust the downforce according to the cartridge manufacturer’s recommendations. One mark on the scale represents 0.05g of downforce.
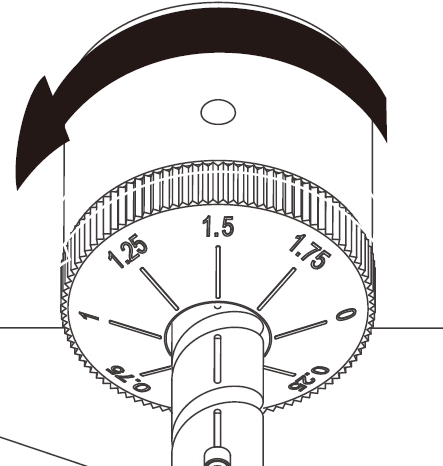
NOTE: The recommended downforce for the factory-fitted cartridge is 3.0g or higher
6. Connection to Amplifier/Speakers
This turntable uses a moving magnetic cartridge and has a RIAA amplifier built in. If you are using a separate phono input or phono amplifier, set the RIAA ON/OFF Switch to OFF.
7. Main Power Connection
The power adapter is in the foam packing material. Unpack the power adapter and plug the small end into the DC Power Jack located at the back side of the turntable. Plug the power adapter into your power outlet.
8. Operation
Connect the included power adapter to the unit and press the power rocker switch to be ON position.
Remove the needle cover from the cartridge.
Place the slipmat on the platter and place a record on the slipmat. If using 45 RPM records, put the 45 RPM adapter on the center spindle before placing the record on the platter.
Set the 33/45 RPM Selector according to the type of record.
Turn the Start/Stop dial to the Start position to begin spinning the platter.
Unlock the arm clip and set the Lift Lever to the up position.
Position the tonearm over the desired location (groove) on the record.
Carefully lower the tonearm on the record, by lowering the Tonearm Lift Lever.
When you are finished playing the record, raise the tonearm, return it to rest on the arm clip, and turn the Start/Stop dial to the Stop.
9. Maintenance and Cleaning
Your turntable requires little to no regular maintenance. Remove dust with a slightly damp antistatic cloth. Never use a dry cloth, this will create static electricity and attract more dust.
It's recommended to install the stylus cover before cleaning or maintenance is carried out to avoid damage. If the turntable is not used over a long period of time, the drive belt should be removed to prevent unequal stretching.
Always disconnect the record player from the power supply as a precaution before maintenance!
10. Cartridge Replacement
NOTE: While it is possible to replace the cartridge, it is not recommended. The turntable comes configured with a standard cartridge, and using other cartridges might result in improper functionality.
NOTE: If you are unfamiliar or uncomfortable with completing this procedure, we recommend consulting with a professional/your point of purchase to perform the installation.
Before replacement, put the stylus cover back on the stylus to prevent damage to the stylus during the replacement process.
Carefully remove the wire leads from the original cartridge.
Loosen the two screws on the headshell that are securing the cartridge and then remove the original cartridge.
Mount the new cartridge to the headshell and tighten it lightly. Do not completely tighten the screws at this moment.
Connect the wire leads to the new cartridge’s terminals.
The wire lead color codes are as below:
White Left channel positive (L+)
Black Left channel negative (L–)
Red Right channel positive (R+)
Black Right channel negative (R-)Adjust the cartridge’s position to make sure it is precisely aligned on the headshell so that the stylus will be tracking the grooves in parallel perfectly.
To achieve this, place the included paper cartridge alignment protractor over the turntable spindle, carefully lift the tone arm and place the tip of the stylus on the points marked 130mm and 250mm respectively. Fine tune the cartridge’s position on the headshell until the cartridge is perfectly in parallel with the reference lines at both points.Tighten the screws completely once the perfect